| Forms Alignment | See Also |
Follow the steps below to align your print forms...
Step 1
On the "Billing" screen, select a deal from the "Deals List" grid and choose the print form that you wish to align, from the "Forms List".
Step 2
Insert a blank piece of paper into your printer just as if it were the actual form (Note: it is best to use two sheets of chained paper when aligning longer forms such as bank contracts).
Step 3
Click the "Print Form" button and wait until the form has finished printing.
Step 4
Remove the paper from the printer and place it on top of the actual blank form that you are aligning. Hold them up to the light and position the top paper so that the text lines up where it should on the form.
Step 5
You should now see a gap between the paper and the actual form at both the top and left edges. Measure the top gap and enter the measurement in the "Top Margin" field. Then Measure the left gap and enter the measurement in the "Left Margin" field. The margins are entered as inches so 3/4 inch would be entered as ".75". For further fine tuning, the margins can be carried out up to three places to the right of the decimal point such as "1.258".
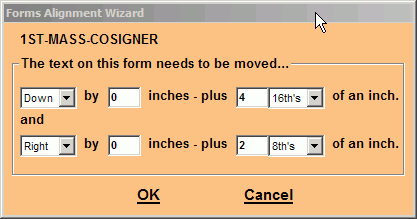
NOTE: The "Form Alignment Wizard" button on the Billing screen will give you access to a utility that will help you line up your print forms by converting fractions of an inch to the required decimal format.
Repeat each of these steps the first time you use a new print form.