| Inventory | See Also |
Once you locate a record click the Edit button to recall the vehicle and make changes to it or click the Add New button to add a vehicle record to your inventory.
You will notice that the grid has a "Selected" column. You can use it to select multiple records and then click the Print button and print a "Selected Inventory" report.
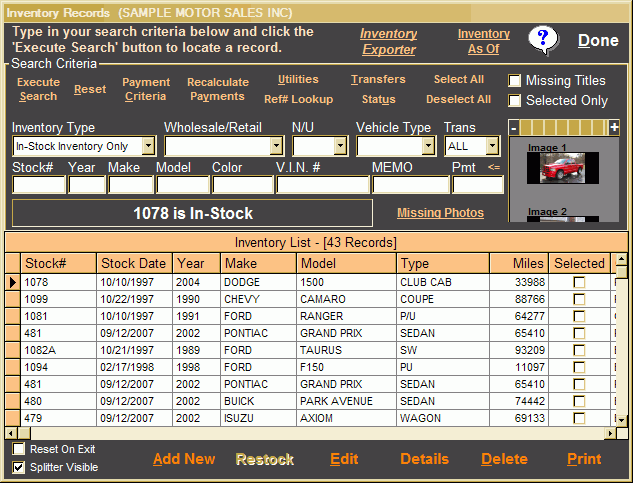
The Inventory screen has quite a few buttons that give you access to many tools and utilities. Their functions are as follows:
- The Execute Search button filters out any records that do not match the search criteria fields that you fill in.
- The Reset button resets the software to it's default criteria, showing all in-stock inventory.
- The Utilities button gives you access to the following tools:
- Global Markup - Runs a routine that will mark up all your in-stock vehicles by a flat dollar amount or a percentange.
- Mark All Retail At Zero - This tool will reset all your retail values for in-stock vehicles to zero.
- Global Pack - Runs a routine that will change the pack amount for all your in-stock vehicles.
- Use caution when using these utilities because the changes are irreversible.
- Ref# Lookup button allows you to locate records by expense reference number.
- Transfers button allows you to transfer inventory between two different companies (only used by users that track multiple businesses). The utility can also be use to change a stock number of a car.
- The Status button allows you to change the status of vehicles (0=incomming, 1=instock and 2=delivered).
- The Select All button selects all records in the grid list. Let's say you want to print a list of all your Fords... type "FORD" in the "Make" field and click the "Execute Search" button. Next click the "Select All" button. Now simply click "Print" and "Selected Inventory".
- The Deselect All button deselects all records in the grid list.
- Add New button is used to add inventory records. Generally this is only used for cars bought a auction as trade-ins are added automatically when deals are marked as delivered (See Marking Deliveries ).
- The Restock button is used to restock previously sold inventory.
- The Edit button is used to access the Deal Editor screen where you can make changes to existing records.
- The Details button is used to access the Deal Editor screen but the costs are hidden.
- The Delete button is used to delete the selected record. Only in-stock deals can be deleted.
- The Print button gives you access to various vehicle specific inventory reports.
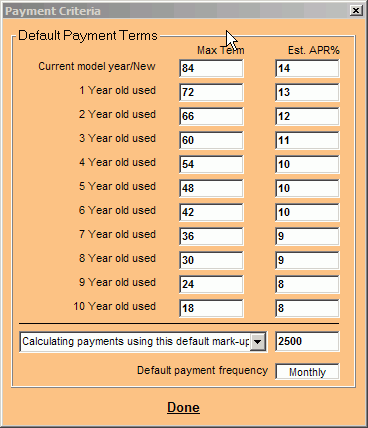
The application also has a unique tool built into it which calculates a finance payment on each car in your inventory giving you the ability to conduct vehicle searches based on monthly or weekly payments. The "Payment Criteria" screen is where you will define the payment criteria to enable the program to calculate all the payments. Simply fill in the fields and click the done button.